A Beginners Guide to Google Tag Manager, Goal set up and Event tracking
22 Oct 2020
In this guide:
– Creating and implementing Google Tag Manager
– Setting up email tracking
– Setting up phone call tracking
– Setting up form submission tracking
Google Tag Manager, analytics reporting and goal tracking each have their own place within the world of digital marketing.
Google Tag Manager has become the ‘one-stop-shop’ to hold all your tracking tags. Analytics reporting reveals highly valuable insights that greatly improve decision-making and goal tracking highlights essential customer touchpoints through-out their journey with your business.
In this guide, we will discuss the importance of Google Tag Manager, how to create & implement GTM on WordPress, setting up various goals & events and how to analyse this via Google Analytics. Keep reading to learn more.
What is Google Tag Manager?
Google Tag Manager is Google’s very own tracking tag management tool. This tool is used to house all added 3rd party tools and tracking software including Heat Maps, Google Analytics, Facebook Pixel, Google Ads as well as custom goals and events that have been created.
Google Tag Manager has been around for multiple years and is very popular among digital marketers. It is very easy to use after having some practical experience and there is an endless amount of youtube tutorials available for beginners to advanced users. Check out Google’s very own Overview to Tag Manager youtube video – it’s super helpful.
What are tags, triggers and variables in Google Tag Manager
Before moving forward, we will discuss what tags, triggers and variables are in Google Tag Manager. Tags, triggers and variables are within GTM itself and each play a role in creating the event and motion to be tracked.
What are tags
Tags are what holds the trigger and variable for the tracking event. They are the house that holds everything in it. Tags communicate with tracking and reporting platforms such as Google Analytics.
What are triggers
Triggers are the action point. The trigger fires on the touchpoint that has been created. For example, a trigger could be when a user clicks on an email link. (mailto:[email protected]). This means that any tags that reference a particular trigger will fire
What are variables
Variables come in two forms, built-in variables and custom-defined variables. Variables are the data layer input. It’s where a user can highlight a certain value that is of importance to a particular trigger.
Built-in variables will need to be switched on and any custom-defined variables will need to be added when a new Google Tag Manager is created. Read Google’s Components of Google Tag Manager to learn more.
What is the importance of using Google Tag Manager?
Using Google Tag Manager is an essential aspect for any data analytics reporting and conversion touchpoint tracking.
Having Google Tag Manager implemented allows you to add event tracking on important user touchpoints including email clicks, phone call clicks, form submission completions, e-commerce/revenue tracking and much more.
What are the benefits of using Google Tag Manager?
It helps marketers, business owners and stakeholders make a more informed decision regarding their business marketing strategy, future growth and can also show what is working and what needs improvement in the world of lead generation.
It’s also known to increase website load speeds (great for SEO). By consolidating all tracking tags within GTM itself, allows a user to remove all 3rd party tracking tags across a website which increases rendering speeds.
Now that you have been introduced to what google tag manager is and the importance of it, let’s get to the practical side. Let’s discuss GTM creation & implementation on WordPress as well as goal tracking set up for emails, phone calls and form submission completions.
Here is our 5 step guide to setting up Google Tag Manager and implementing it on WordPress
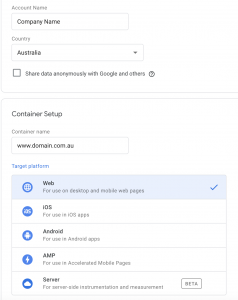
Step 1: Create a Google Tag Manager account
The first step is to create a Google Tag Manager account to link to the website. This is done simply by clicking the ‘create an account’ button in the workplace section. The account details will need to be filled out that matches the website’s functionality. The target platform will mostly be for a web-based application as this is the most common platform for the average online business.
Step 2: Install Google Tag Manager onto the WordPress website
After the Google Tag Manager has been created for the website, a pop up will appear informing the next step. This details the instructions for website implementation and provides the exact code that is needed. The below screenshot shows the example code that will be used for this article. Each GTM code is different.
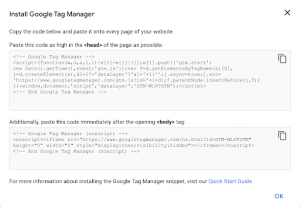
Following the instructions above, the first snippet of code will need to be added as high in the <head> of the page as possible and the second snippet of code will need to be added immediately after the opening <body> tag.
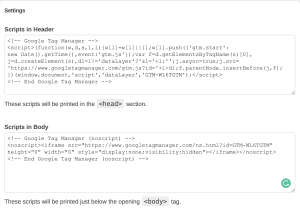
A user-friendly way to add this code in is by using our WordPress recommended plugin ‘Insert headers and footers’. Once the plugin is activated, proceed to add both snippets into the dedicated placements and click save.
Step 3: Create a user-defined variable that identifies with the relevant Google Analytics account
A user-defined variable will need to be created to link to the chosen Google Analytics account. This is accessed in GTM under the variables section and is classified as a new user-defined variable option.
The ‘variable type’ will be Google Analytics Settings and the ‘Tracking ID’ will be the Google Analytics tracking UA code. Our recommended GA universal variable set up is shown below.
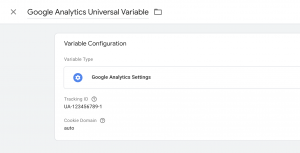
This variable will be used through the goal set up process as each tag created in Google Tag Manager will need to link to this Google Analytics universal variable as it states the relevant Google Analytics tracking ID.
Step 4: Create a Google Analytics universal tag in GTM
Disclaimer: Only add this tag if there is no Google Analytics tracking code on your website. If this tag is created when there is already a GA code on the website, it will cause duplicate tracking issues and affect the accuracy of the data. This step can be skipped if there is already a GA code on the website, or as recommended, the GA code can be removed from the website and this tag can be created to remove the amount of 3rd party tracking codes.
To centralise Google Analytics in Google Tag Manager, a Google Analytics universal tag will need to be created. This is done by creating a new tag called ‘Google Analytics universal tag. Next, set the ‘track type’ to page view, sync the Google Analytics universal variable in the Google Analytics settings drop-down and set the trigger to fire on all pages. Our recommended tag set up is shown below.
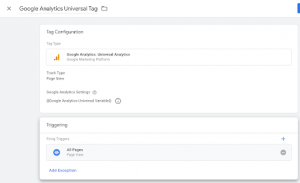
Once the new updates on Google Tag Manager have been published, the newly created Google Tag Manager will now be synced with Google Analytics. GTM is now ready for goal and event set up. Keep reading to discover how to set up essential goal and event tracking for your website.
Here is our 5 step guide to email click tracking in Google Tag Manager
Step 1: Check if the email on the website is a clickable link
It’s important to ensure that all email mentions are clickable otherwise we won’t be able to track these actions.
![]()
As shown above, the email mention has a ‘mailto:’ added on the link. This is the clickable action that we will track.
Step 2: Set up an email trigger in Google Tag Manager
Next step is to set up a trigger in the GTM that informs when the trigger should fire.
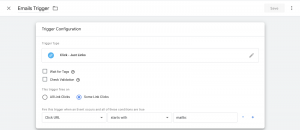
This is done by adding the trigger type ‘click – just links’, ticking the ‘some links box’ and adding the ‘click URL’ variable which starts with ‘mailto:’ (the clickable email link).
Example trigger set up for email tracking
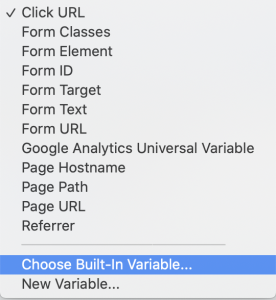
Please note, if the variable option is not available, you will need to add in the built-in variable. This is accessed via the drop-down option.
Step 3: Set up an email tag in Google Tag Manager
Setting up the tag that will hold the emails trigger is the next part for tracking set up.
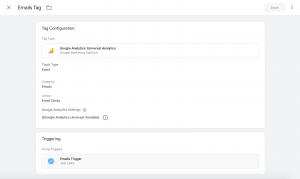
Setting up a tag is done by choosing a ‘track type’, naming the ‘category’ & the ‘action’, adding the Google Analytics tracking variable, and connecting the newly created trigger.
Track type will need to be an event as this type of tracking is classified as an event or user event. Category will need to be relevant to the tracking description – the word ‘emails’ will suffice. Action will need to be relevant to the trigger description such as ‘email clicks’.
The Google Analytics settings should be set to the Google Analytics universal variable as discussed when setting up GTM for the first time.
The newly created trigger will need to be added to the tag in the triggering option below the tag configuration.
Example tag set up for email tracking
Please note, the naming of the category and action of a particular tag is very important. This is used to connect the goal tracking in Google Analytics. If the exact naming convention is not used in Google Analytics, the goal will not fire.
Step 4: Google Analytics goal set up for emails
Now the tag needs to be synchronised with Google Analytics. This is done by accessing the goal set up in the GA admin cog.

Once this is accessed, a new goal will need to be created. The first section in the goal set up will have a custom option at the bottom. Apply the custom options as this is a custom event that has been created in GTM.

The goal description will be an event. This is what is stated in the tag within Google Tag Manager as the track type.

The naming convention should be relevant to the goal/event. For this example we have named the goal ‘Emails’.
The third step is setting up the goal details. This is where the category and action name come into play. As stated above, the category and action name need to be exactly the same otherwise the Tag will have trouble syncing and firing.

Once this is complete, click save.
Step 5: Testing the new email goal on Google Analytics
This is the final step and arguably the most important one. When a goal is set up, it’s essential to check if the goal is actually reporting accurately. Accurate data is the backbone of analytics reporting.
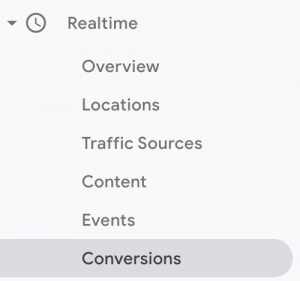
To test the accuracy of the goal, this is done in the real-time report under conversions. (Real time > Conversions)
When a click is made on the email link on the website, we are able to see this register in Google Analytics.
Please note, it can take up to 24 hours for new data to start populating properly in your google analytics reports. There we have it, email tracking is now part of your daily analytics reporting.
Next is the step by step process for phone calls tracking. This is very similar to email tracking.
Here is our 5 step guide to phone call clicks tracking in Google Tag Manager
Step 1: Check if the phone number on the website is a clickable link
All phone numbers on the website will be in a clickable form. This allows the user to click the number using their mobile device which will automatically start the dial in process.
![]()
As the screenshot shows above, the phone number has a ‘tel:’ link attached to it. This is the clickable link that the trigger will fire on.
Step 2: Set up a phone call trigger in Google Tag Manager
A trigger will need to be created that identifies the intended action. This is set up in a similar fashion to the emails trigger.
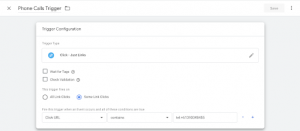
The trigger type will be ‘click – just links’, the trigger fires on ‘just some clicks’, the trigger will fire on the variable ‘click URL’ which contains our tel: link number ‘tel:+61390348455’
Example trigger set up for phone calls tracking
Step 3: Set up a phone calls tag in Google Tag Manager
As mentioned, the tag will need to be set up to house the trigger and enable the syncing process with the Google Analytics goal set up.
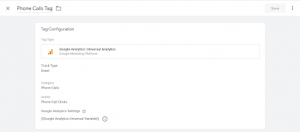
Similar to the email tag, the ‘track type’ will be set as an event. The category will be named ‘Phone Calls’, the action will be named ‘Phone Call Clicks’ and the Google Analytics settings should be set to the Google Analytics universal variable.
Example tag set up for phone calls tracking
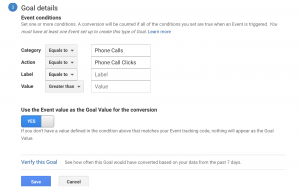
To highlight what has previously been mentioned, the category name and the action name will need to be exactly the same in the Google Analytics goal set up otherwise there will be syncing issues. Now, add the trigger to the newly created tag.

Step 4: Google analytics goal set up for phone calls
Similar to emails, the tag will need to be synced with Google Analytics. This is accessed in Goal set up in the Google Analytics admin cog.
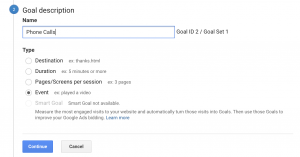
Once this is accessed, a new goal that references Phone calls will need to be created. The goal will be a custom event as this is a custom event created in GTM.
The goal description should use a naming convention that is relevant to the tag and trigger set up. ‘Phone Calls’ will suffice for now. The goal type is also an event as stated in the phone calls track type.
The next step is to add the goal details. This allows the syncing process to begin. As mentioned, it is very important to have the exact same name convention as the tag itself otherwise there will be syncing and firing issues.
Once this is completed, click save.
Step 5: Testing the new phone calls goal on Google Analytics
We are almost there, this is the final step – the testing of the goal set up. We always want to ensure accurate data reporting. To test the new goal, this is accessed within the real time reporting, in the conversions section. (Realtime > Conversions)
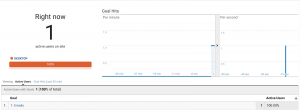
As the click is made on the phone call tel link on the website, this is registered in the realtime conversion reporting.

Keep in mind, it can take up to 24 hours for the data to start populating outside of the realtime reporting. Phone call tracking is now a part of your everyday analysis and reporting.
The last but not least, form submission tracking. This step will be based on the most user-friendly way to set up form submission completions.
Here is our 4-step guide to form submission tracking using a dedicated landing page
Step 1: Create a landing page for a successful completion
A form submission success landing page will need to be created within the CMS. This is very simple to do. First, create a new page and set the page name to form submission success.
Next, add content on the page that informs users of their successful form completion as well as content with internal links that directs them to other important pages on the website to encourage users to keep engaging with your brand after a form is complete.
Example: “Thank you for your successful form submission. Our friendly team will be with you shortly. In the meantime, feel free to continue exploring our shop section, check out our latest blogs or navigate back to our home page”
Step 2: Add the newly created landing page to the form submission application
The newly created form success landing page will need to be added to the form submission application settings.
This is done by accessing the form application on the CMS admin, choosing the form that will need the landing page applied and updating the settings by adding the landing page as the confirmation type.
An example of the confirmation setting type in WordPress is shown below
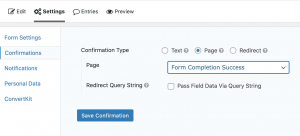
The form now has a dedicated landing page that users will land on when a successful form submission is completed.
Step 3: Setting up destination page tracking in Google Analytics goal set up
This being the most user-friendly way to set up form submission tracking, we are able to skip the entire Google Tag Manager setup process and jump straight to setting up a goal in Google Analytics.
By accessing the goal settings in Google’s admin cog, the goal set up process can begin. The first step is to create a new goal and select the custom goal set up option – the same for emails and phone calls.
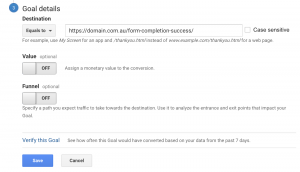
The second step is to input the goal description. The naming convention should be relevant to the goal that is being tracked. For this example, we have named ours ‘Form Submissions’. Next the destination box will need to be ticked. This informs GA that the goal completes at a particular destination or on a destination page as such – our newly created landing page.
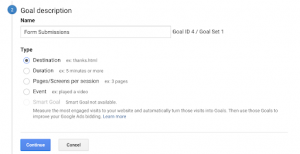
The third and final step in the goal set up will be adding the exact URL of our destination page or landing page and setting it to ‘Equals to’. (only use equals to if the landing page URL is exactly the same. If the landing page URL has added characters attached, this will need to be set to ‘Begins with’) Now anytime that a user successfully completes a form submission, the goal will fire once they have been directed to this dedicated landing page.
Step 4: Testing the new form submission tracking goal in Google Analytics
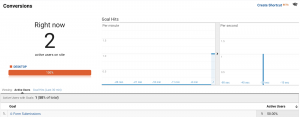
This is done in the exact same place as the emails and phone call event testing in realtime reporting. (Realtime > conversions) To test this properly, it’s recommended to personally submit a form through the form submission application.
As shown below, the successful form submission has appeared in our realtime reporting. We can safely say that the form submission goal set up is now complete.
Goal and event tracking for your business
There we have it, GTM creation & implementation and goal & event tracking for three key user touchpoints for any small, medium or large-sized business. You are now ready to follow this guide, implement your own Google Tag Manager, set up these conversion touchpoints, add them to your Google Analytics dashboard and see which channels generate the most valuable traffic for your business.
Knowing how customers interact with a business’s website and at what point they decide to convert builds great insights into the performance of a business’s digital presence and generates valuable engagement metrics.
These metrics can be measured month on month, year on year and provide conversion percentage rates which can be compared via the various channels that users currently discover your website through.
We are the experts in goal tracking and increasing your conversion touchpoint count
If you are looking for assistance with goal tracking, looking to add more advanced tracking including e-commerce/revenue data or want to increase traffic to your website to increase those conversion touchpoints, reach out to one of our friendly SEO specialists at StudioHawk.
Contact us via our form submission and we will be happy to answer any questions you may have regarding Google Tag Manager, Google Analytics and increasing your conversion rate.